Intensify Pro Review / My First Look... and a Killer Deal
The Sleeping Dragon / Buy a print
The Sleeping Dragon / Treatment in Intensify Pro
A couple of weeks ago, Macphun launched Intensify Pro v1.02. Completely out of the blue, the ever-friendly Ashley over at Macphun reached out to me and asked me to have a look at their new version. And I've been doing just that for the last week or so.
As luck would have it, Macphun is offering a killer deal now through June 22nd. For $100 you get:
- Macphun's Create Kit Plus, which includes Intensify Pro, Snapheal Pro and Focus Pro
- A ViewBug Premium membership
- A free copy of Macphun's next application due late summer (first 500 people only)
A great deal and a mystery gift. Phun, phun. (Couldn't help myself.)
The Preamble & Disclaimer Stuff
Just so we're all on the same page here... I don't write reviews for products I don't like. If I like a product and use it, I tell you about it. If I see value in a product, I'll tell you about it. I don't accept payment from a company to write a review. Product links on the site may be affiliate links. If you like what you read and use one of my links to purchase it, I'll make a dollar or two. That's it. Plain and simple. Now let's get to it.
Intensify Pro runs as a plug-in for Aperture, Lightroom and Photoshop
Installation
Installation is very easy. Like any typical Mac Application, open or unpack the image you download and drag Intensify Pro into your Applications folder.
Intensify Pro can run as a plug-in for several image editing applications. The ability to run as a plug-in is the major differentiator of Intensify Pro vs. Intensify (the one from the Mac App store). If you own Aperture, Lightroom, Photoshop or any combination therein, get Intensify Pro. If you're anything like me, you want to centralize your photo editing around your DAM.
It was a little unintuitive to install the plug-ins, at least for me. I needed to launch Intensify Pro as a standalone application and load an image (that was the unintuitive part). Once I had an image loaded, the Intensify Pro > Install Plugins option became available. From there, installing the plug-in for Aperture was a breeze.
The Interface
I ran Intensify Pro as an Aperture plug-in. Intensify Pro has a simple interface. A toolbar across the top, your image is on the left and the adjustment controls on the right.

Intensify Pro Toolbar / Aperture Plug-in Mode
From left to right:
- Apply / Cancel: These buttons are present when Intensify Pro is run as a plug-in. Apply sends the updated image back to the host application. Cancel, well, cancels. In standalone mode, the Open and Share icons are in the toolbar. Takeaway: you can't share directly to social media when Intensify Pro is run as a plug-in. For me, no big deal. I typically do final touches in my DAM before sharing anyway.
- Navigator: When zoomed in, the navigator helps you quickly scoot around to other areas of your image. The navigator can only be placed within the same area as your image.
- Zoom: Pretty self explanatory. 100% is useful for detailed masking. Zoom in, zoom out, and fit are what you'd expect in any photo editing application.
- Preview: Click and hold the Quick Preview (eye) icon for a quick before/after comparison. The slash "/" hotkey does the same thing. There's also a side-by-side comparison mode.
- Undo/redo: They do what they say. Truth in advertising. :)
Presets Pane
Intensify Pro comes bundled with a load of presets – 68 to be exact. The strength of any preset is controlled with an Amount slider (think "opacity" if you're used to working with layers). Favorite presets are flagged as such by toggling on/off the yellow star next to the preset name.
You can also craft and save your own presets. User defined presets appear in the Custom area. Intensify Pro offers basic organizational tools for presets within the custom area (not pictured). To export a custom preset, right click and choose Export.
Importing presets is clunkier and driven via the Finder. You cannot import presets when running in plug-in mode. Instead, launch Intensify Pro as standalone and choose File > Show Presets Folder. The folder is shown in the Finder, and then presets can be dragged and dropped into Intensify Pro. A clunky process, but doable.
Adjust Pane
Any preset can be further fine tuned in the adjust pane. The same controls are available irrespective of the preset you selected. A preset is a collection of these various adjustments. The controls are too numerous for me to detail here.
Adjustments can be toggled on and off. The Color Temperature and Vignette are turned off in the example pictured. Of course, you can go into any of the individual adjustments and set sliders set to your liking.
Adjustments can also be selectively applied to portions of your image. Across the top of the right hand pane are four icons:
- Hand: Move around your image window when zoomed in.
- Brush: Selectively apply the adjustments to portions of your image. When in brush mode, another tool bar is displayed with controls for the brush size, opacity and softness. Also, there are controls to display or invert the mask.
- Erase: The opposite of Brush.
- Gradient: Apply a gradient mask for the adjustments selectively to an area and gradually fade out the effect. A gradient tool bar to control the angle and opacity is also displayed. Only rectangular gradients are supported. No circles or ellipses.
Using these tools to selectively stylize your image with an effect. Notably missing is any type of edge detection in the masking brushes. Room for improvement.
When you craft a set of adjustment sliders just so, click the Create Preset button. Provide a name and the preset is saved in the custom area.
Intensify Pro Preset Pane
Intensify Pro Adjust Pane
Layers
At the top of the Presets and Adjust panes are layer controls. After applying one preset or set of adjustments to your image, you can add a new layer and apply another preset. You must have the Hand tool selected to add a new layer (I find this a little annoying). Layers are not meaningfully named by default, although you can double-click the layer and provide your own name.
Intensify Pro supports up to 5 layers. Depending on how many presets you want to selectively apply to portions of your image, this can be a limiting factor.
A Processing Flow
The flow I found makes sense for Intensify Pro is to start with a preset, dial back the amount (opacity) of it, and fine tune the adjustments. From there, if the adjustments only make sense for a portion of the image, use the masking tools accordingly. Then, add a layer, and repeat.
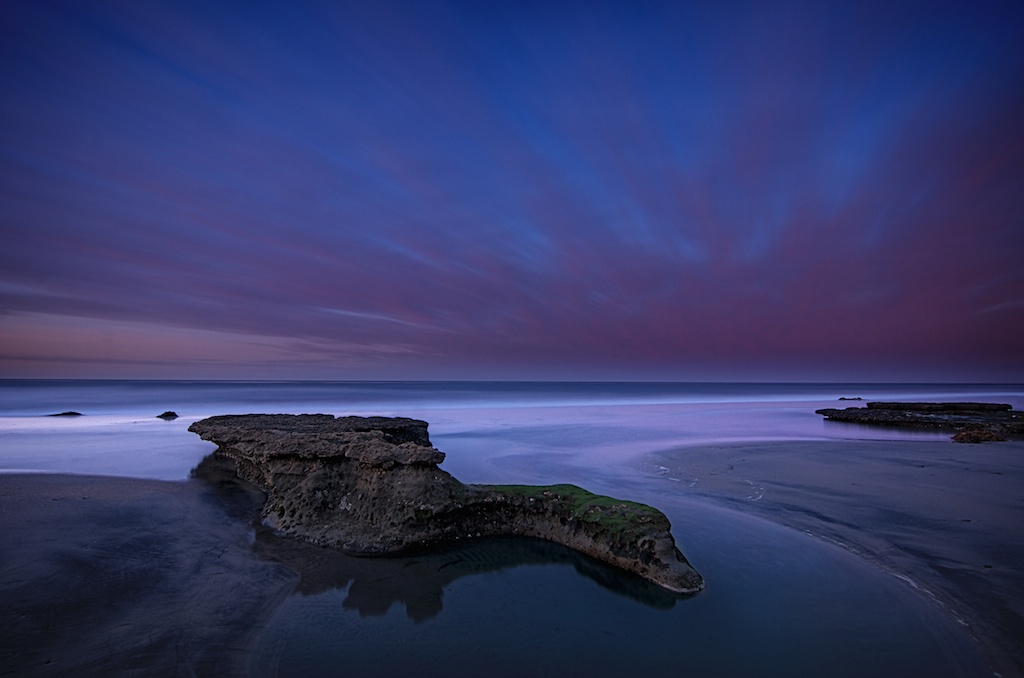
In creating the sample image at the top of this post, I started with the Enhance Landscape preset. One click and a dial down of the amount and I loved what Intensify Pro did to the sky in this long exposure. Next, I added a layer and chose the Absolute Clarity preset. I didn't want the sky getting the detail, so I use the gradient tool to mask the effect away from the sky. That was it. (Note: Yes, there's still cleanup I'd need to do on the image, removing distractions, addressing a couple of dust spots. My intent with this review wasn't a full end-to-end processing of an image.)
My original processing is a more peaceful, serene feel. Intensify Pro really brought out the motion in the sky, and takes the image a very different – yet still quite pleasing – direction.
Random Notes
Here's a few other things I found in Intensify Pro:
- At one point I clicked the Cancel button when running as a plug-in and Intensify Pro did not warn me about unsaved work. I think the software is too trusting there.
- Processing time is on the slow side. More so when applying all the changes, less so on the real time adjustments. I shoot with a D7000 we're talking 16MP RAW images. Not small files, but not huge. And my MacBook is decked out with 16MB DRAM. I expected snappier saves.
- The PSD format is supported, however once work is saved and Intensify Pro returns to Aperture, layer information is no longer in the PSD file. Re-opening the file in Intensify Pro, or in another application that supports PSD, shows only a single layer.
- Uninstalling the plug-ins and application worked cleanly. (I did re-install them after this test. :)
- Macphun's US headquarters are in Del Mar, California. A stone's throw from San Diego. We're neighbors!
There you go! Macphun offers a trial version of Intensify Pro from their website. If you like what you've seen here, head over to Macphun's site and check out Intensify Pro.